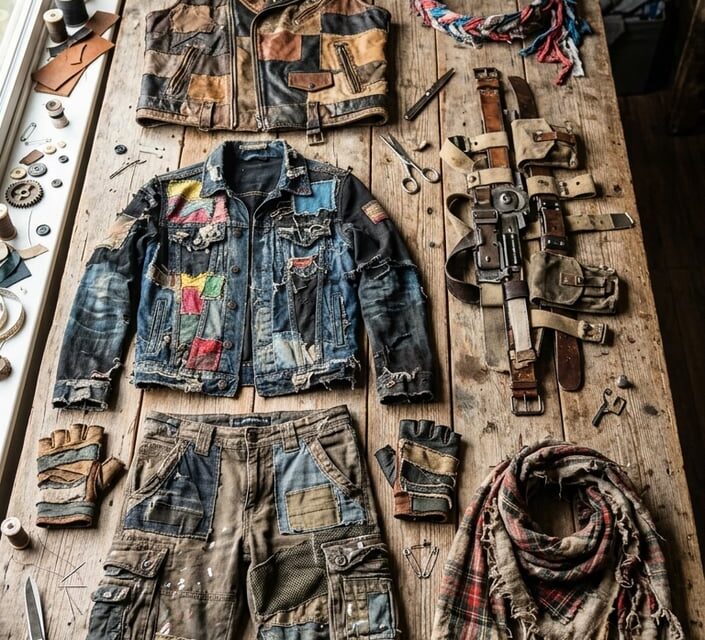
You can transform worn-out clothes into gritty, functional pieces that nail a wasteland aesthetic without spending much. You’ll learn simple, practical ways to repurpose coats, jeans, sweaters, canvas bags, belts, and bottles into rugged outfit elements that look authentic and hold up for cosplay, festivals, or creative play.
This article guides you through approachable DIY projects that focus on texture, utility, and weathered style while using materials you likely already own or can find cheaply. Try a mix of sewing, cutting, distressing, and creative assembly to build a cohesive scavenger-ready wardrobe that reflects your personal vision.
1) Distressed Leather Duster Made from an Old Coat
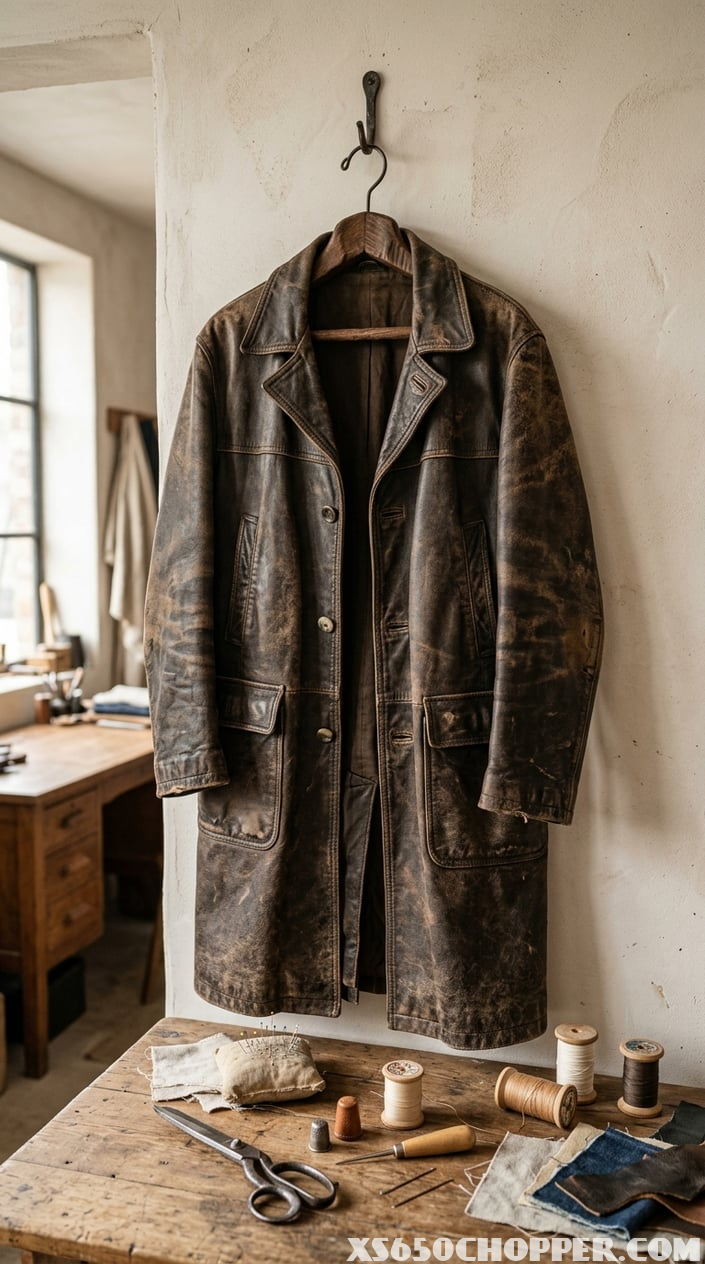
Take an old leather or faux-leather coat and turn it into a long, rugged duster that fits a wasteland aesthetic. Start by assessing seams, lining, and overall fit so you know what repairs or reinforcements you’ll need.
Remove or shorten sleeves for a trench-style look, or add patch panels from other garments to lengthen the body. Use heavy-duty thread and a leather needle; if you don’t have a sewing machine that handles leather, hand-stitch reinforced areas with a saddle stitch.
Create surface distressing with abrasives like a fine-grit sandpaper or steel wool to wear high-contact areas such as cuffs, collar, and hems. Add small scuffs and creases by folding and heating with a hair dryer, then gently working the leather with your hands to set the folds.
Use diluted acrylic or leather-safe paint to add grime, faded tones, or subtle color variation. Apply pigments sparingly and layer washes for a natural, sun-bleached appearance rather than a uniform color.
Patch visible damage with contrasting fabric or leather scraps for a repaired, lived-in look. Sew or rivet these patches with exposed stitching to emphasize the handcrafted, scavenged vibe.
PRO TIP
Test distressing and paints on an inconspicuous area first so you don’t accidentally ruin the piece. Work slowly—you can always add more wear, but you can’t easily undo over-distressing.
2) Patchwork Utility Vest from Thrifted Denim Jeans
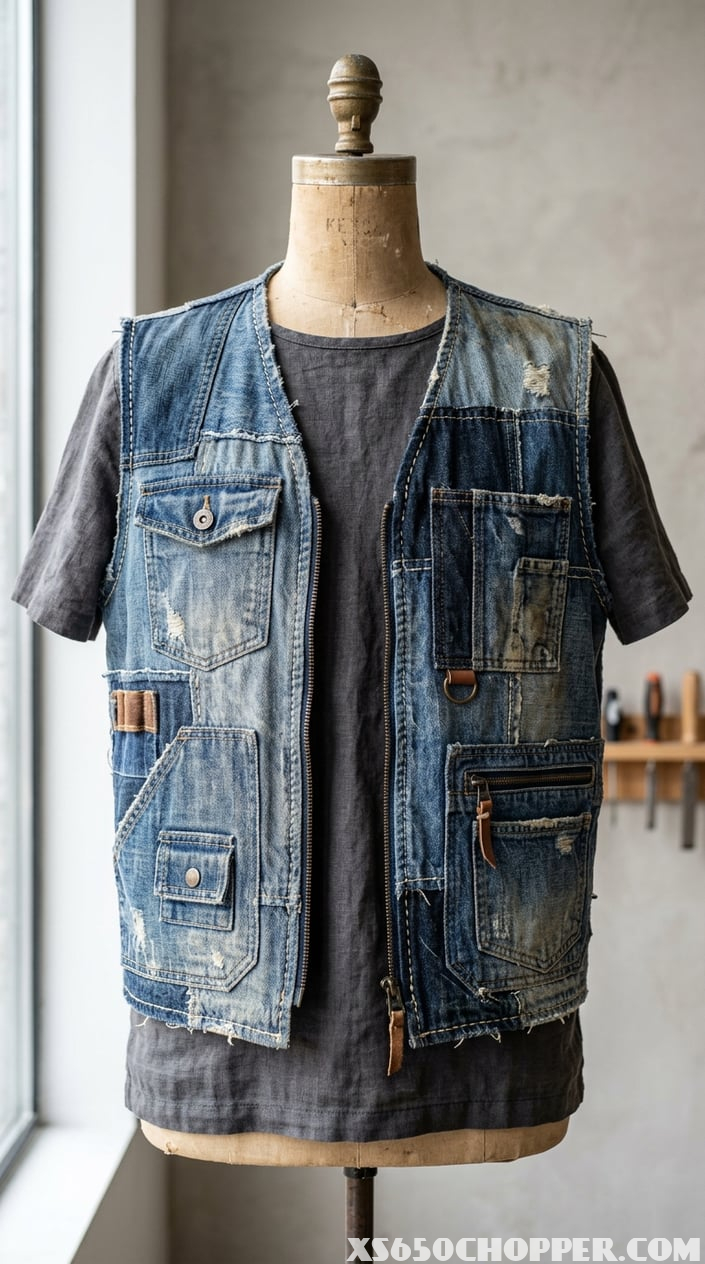
Turn mismatched denim into a rugged utility vest that suits a wasteland aesthetic. You only need a couple of thrifted jeans, basic sewing supplies, and a sense of adventure.
Start by cutting the legs off two pairs of jeans and using the back panels for the vest body. Lay pieces flat and arrange a patchwork pattern that balances color and texture; contrast light and dark denim for visual interest.
Sew panels together with sturdy seams, double-stitching stress points to survive heavy wear. Keep the armholes roomy so you can layer over hoodies or armor.
Add practical pockets from the original jeans—back pockets and coin pockets work great for ammo, tools, or small trinkets. Reinforce pocket edges with bar tacks or rivets to prevent tearing.
Customize edges with fraying, raw hems, or stitched piping depending on how weathered you want the piece to look. For a more finished vibe, topstitch seams and add a sturdy zipper or snap closures down the front.
PRO TIP
Use a scrap of heavier fabric or interfacing inside the collar and shoulders to prevent sagging when loaded with gear. Small metal details like old belt buckles or rivets add character and increase durability.
3) Gasmask Prop Pack Using Recycled Plastic Bottles

You can turn old plastic bottles into convincing gasmask props that complete a wasteland look. This approach focuses on appearance and light, wearable construction rather than filtration or real protection.
Start by collecting a few similarly sized bottles — 1–2 liter soda bottles work well — and remove labels and lids. Cut the bottles carefully to create the main facepiece and filter housings; smooth edges with sandpaper or tape to avoid sharp plastic.
Use duct tape, elastic cord, or repurposed straps from old backpacks to secure the piece to your head. Add layers of painted foam, cardboard rings, or leftover fabric around the breathing ports to sell the layered, scavenged aesthetic. Weather the surface with diluted paint, tea staining, or light sanding to give metal and rubber illusions.
For filter details, stuff crumpled mesh, foam, or fabric into the lower bottle sections and cap them with painted bottle caps or plastic discs. Glue or tape these “filters” to the facepiece so they look functional without needing to be airtight. Small bolts, washers, and spray paint in matte black, gunmetal, or rust tones add believable hardware accents.
Keep weight and comfort in mind; line contact points with a soft scrap of foam or cloth. Test fit and adjust straps so the prop sits steady during movement. If you’ll wear it for long periods, ensure breathing openings are ample and unobstructed.
PRO TIP
Paint the interior edges and straps a darker color to hide wear and sweat stains.
4) Reinforced Elbow/Knee Pads from Wool Sweater Scraps
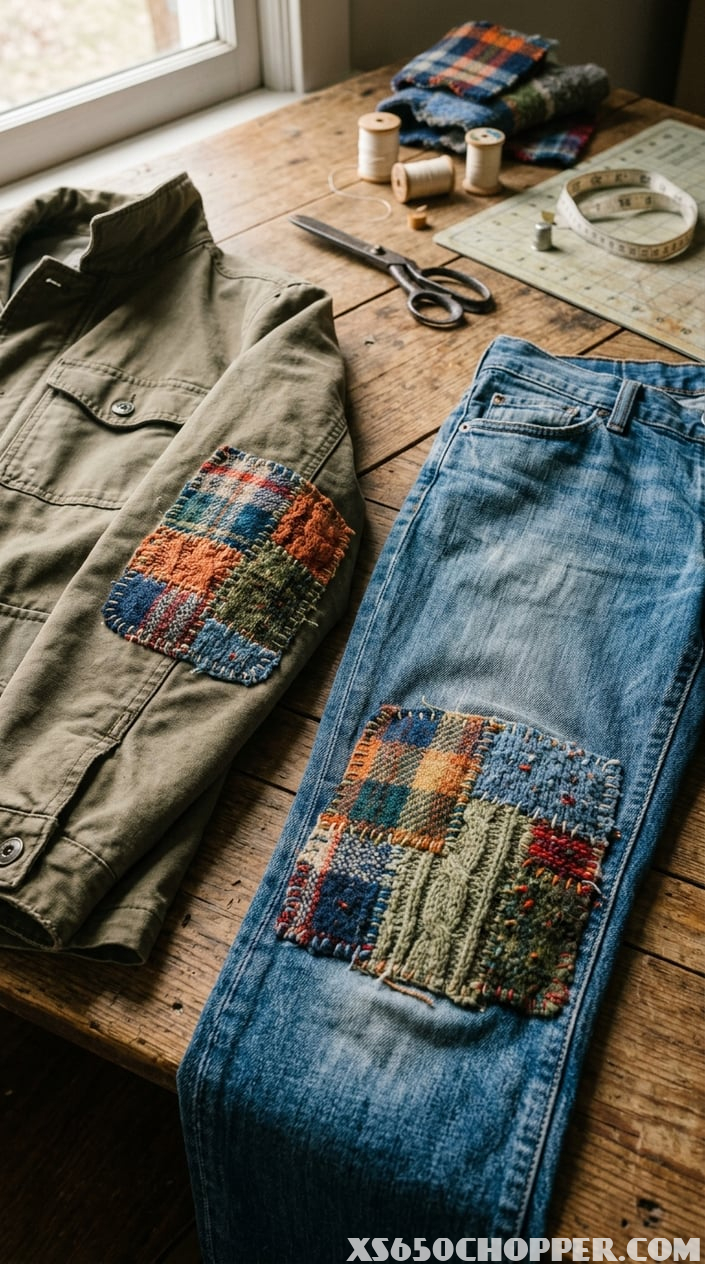
Wool sweater scraps make rugged, insulating patches perfect for elbows and knees. You can cut oval or teardrop shapes to match the wear pattern on your garments.
Felted wool works especially well because it won’t fray and adds thickness without bulk. If your sweater isn’t felted, wash it hot and agitate gently to intentionally felt the fibers before cutting.
Trace an existing pad or draw a template on cardboard to get consistent shapes. Pin the wool pieces in place on the garment, then hand-stitch or machine-sew around the edges using a strong thread and small, even stitches.
For extra durability, sandwich a thin piece of canvas or scrap leather between two wool layers. That adds abrasion resistance while keeping the wool’s insulating properties.
If you want a cleaner finish, use pre-made suede or fabric elbow patches with pre-punched edges; they speed up sewing and look tidy. Decorative felting or embroidery over the patch can reinforce high-stress points and personalize your wasteland aesthetic.
PRO TIP
Trim the patch slightly larger than the worn area so seams sit on healthy fabric. That reduces tearing and helps the patch last longer.
5) Tactical Belt with Ammo Pouches Reworked from Canvas Bags
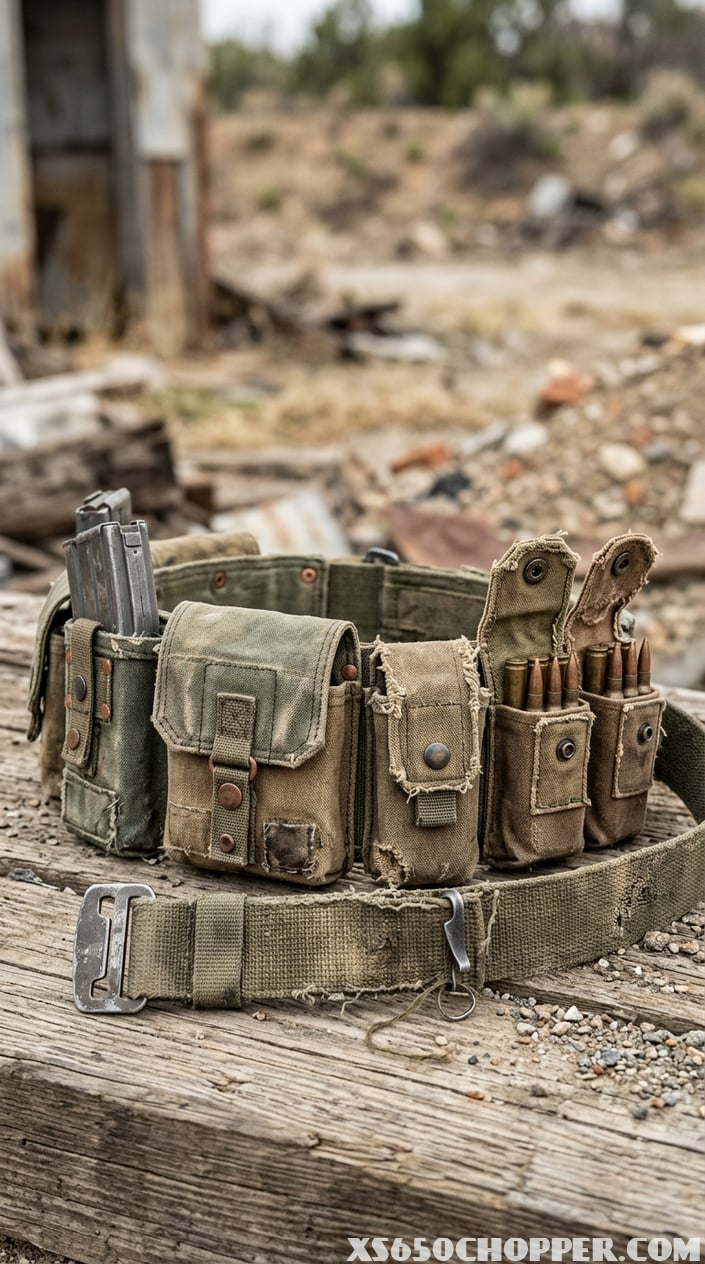
You can turn old canvas bags into a durable tactical belt with ammo pouches using basic sewing and hardware skills. Canvas is sturdy, holds shape, and often already has useful straps and compartments you can adapt.
Start by cutting panels from the bag for the main pouches and belt backing. Use existing seams where possible to save time and keep strength; reinforce stress points with extra stitching or patches.
Measure your waist and planned pouch placement before attaching anything. Position pouches so they sit comfortably at your hips and rear, and allow full range of motion without digging into your body.
Add closures that match your needs: Velcro for quick access, snap buttons for security, or homemade straps for a rugged look. If you want modularity, stitch webbing loops or add sewn-on MOLLE straps so you can rearrange pieces later.
Use salvaged hardware—buckles and sliders from old backpacks or belts—so your build stays authentic and low-cost. Rivets or heavy-duty bar tacks at load points will prevent the canvas from tearing under weight.
PRO TIP
Line the inside of each pouch with lighter fabric or thin foam to protect contents and keep the pouch from collapsing. This small step improves functionality and gives the finished piece a more professional feel.
6) Layered Scavenger Skirt Assembled from T-shirt Strips
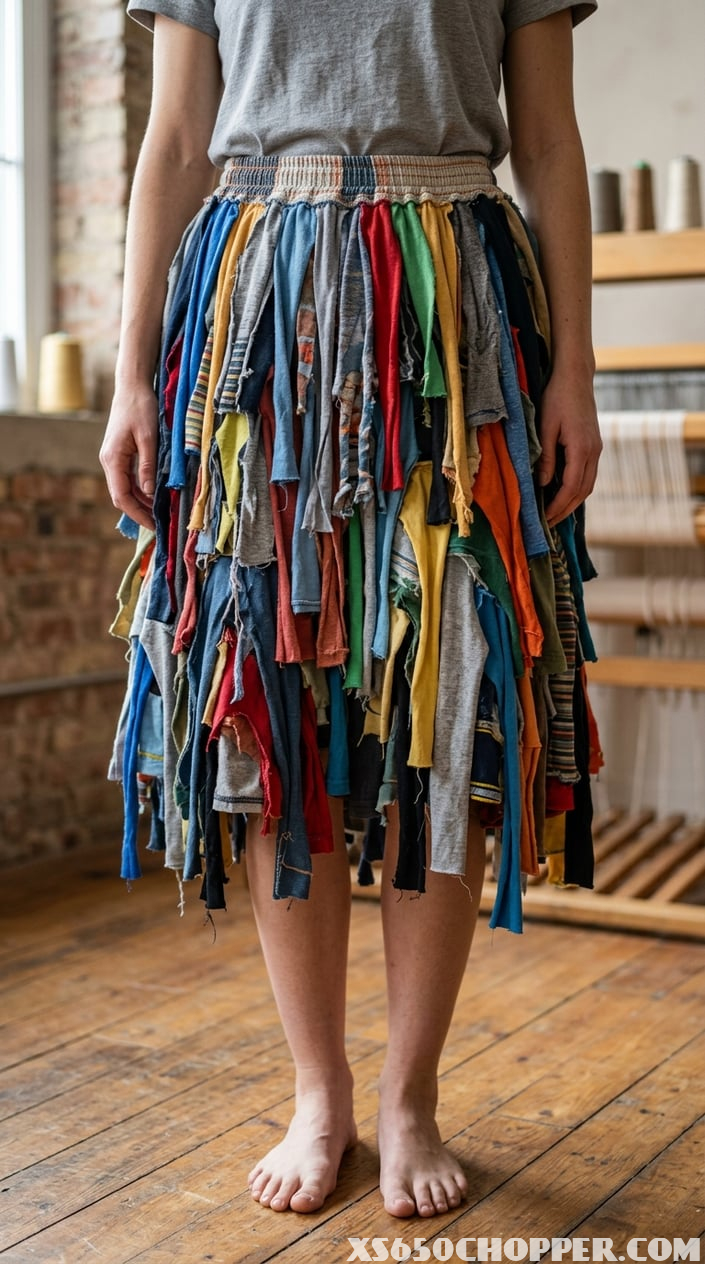
Turn old T-shirts into a rugged, layered skirt that fits a Wasteland aesthetic and moves with you. This style uses cut strips of fabric assembled into tiers, so you get texture and volume without complex sewing.
Start by choosing two to four oversized T-shirts in varied colors or textures. Cut across the body to make horizontal strips, keeping the existing hem where you want a finished edge.
Stagger strip widths for a pieced, scavenged look; slimmer strips add detail, wider ones give structure. You can leave raw edges for fray and grit, or stitch a quick zigzag to prevent excessive unraveling.
Join strips by butting ends and sewing a simple seam, or overlap them and topstitch for strength. For the waist, repurpose a section of the shirt’s neckline or make a casing and insert elastic; both give a comfortable, adjustable fit.
Add detachables — small pockets, belts, or metal bits — by hand-stitching or safety-pinning them on. These elements let you customize protection and storage without changing the skirt’s core construction.
Wear the skirt layered over leggings or torn tights to increase warmth and visual depth. You can also dye or tea-stain strips for a unified, weathered palette that reads like scavenged gear.
PRO TIP
Cut strips on the bias (diagonal to the knit) for more stretch and a slightly flared drape.
7) Weathered Bandolier Crafted from Belts and Jeans Straps

A bandolier adds instant character to a wasteland look and you can make one with items you already own. Use old leather belts, cut denim straps from worn jeans, or combine both for contrasting textures.
Start by laying out the belts and straps to fit across your chest and over one shoulder. Overlap pieces where you want pouches or loops, then mark attachment points with chalk or pins.
Create pockets by folding short strips of denim or cutting small belt segments and sewing or rivetting the sides. Reinforce stress points with extra stitches or small metal rivets so the pouches hold up during wear.
Distress the materials for an authentic, lived-in look. Sandpaper scuffs, diluted acrylic washes, and splashes of brown or gray paint create grime and age without heavy effort.
Use functional details to boost realism: add D‑rings, small carabiners, snaps, or buckles scavenged from other items. These let you hang props or adjust the fit quickly.
Secure everything with a mix of sewing and hardware. Heavy-duty thread and a few well-placed rivets make stronger joins than glue alone, especially where the strap bears weight.
PRO TIP
For extra authenticity, stitch on a tiny loop to hold a faux water bottle or tool. It gives your bandolier a purpose and makes the outfit feel practical.


